The Formatting Template – changing how your models look in Excel
When Openbox creates an Excel model, it starts with a template Excel file. That template tells Openbox what font, colour and styles to use for your model, which column is which, whether there are any additional sheets like a cover sheet, and so on.
Openbox comes with one template (the “Gridlines template.xlsx” file in your OBXComponents folder), but you can make your own. This article will show you how.
Copying the initial template
The first thing to do is to copy the initial template. Open it, and then save it as a new file. Then you need to tell Openbox to use this new file instead of the initial template. To do this, go to the “Help and Settings” menu in the Openbox window and click “Settings”. You’ll see a window like this:
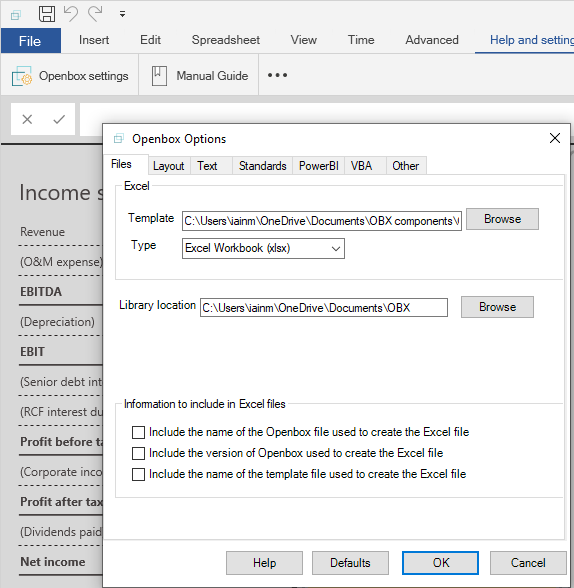
There’s a box marked “Template” near the top, with a file name in it. Click the “Browse” button beside this, select the new template you just saved, then click OK.
You can now change the template to reflect your preferences. The sort of things you can do are:
- change the headers for each sheet
- change which column is which
- add extra sheets to every model
- change the fonts that inputs, calculations and reports will use
- add standard macro(s) to every model
This article covers those one by one. But first, let’s look at the standard template.
Structure of the standard template
Looking from left to right, you can see a cover sheet, a contents page, three yellow InpC/InpS/InpT tabs, two Calculations/CalculationsTable tabs, two blue Results/Results Table tabs, an Output tab, an Issues tab and a Styles tab.
The cover sheet is simply added to every model that Openbox creates for you. You can delete it, or add other sheets that will just be added “as is” to your models.
The contents page will be populated with links to each sheet and section in the final model, if you tick “Include navigation sheet and icons” in the Openbox options window. You can change the colours and fonts that will be used by reformatting this sheet.
The yellow InpC/InpS/InpT sheets will be used for all input sheets in your final model. C is for constants, S is for series (inputs that have a value for each column) and T is for tables.
The calculation sheets will be used for all calculation sheets in your model. Openbox will make as many copies as necessary.
The report sheets work similarly to calculation sheets.
The “Output” sheet is like the cover sheet in that it is simply added to the final model, without modification
The “Issues” sheet is used if you insert any issues into the model using the buttons on the Openbox ribbon in Excel. See the article on the issues log for more information.
Finally, the “Styles” sheet shows examples of the different styles that will be applied to (for example) inputs that are dates. It will be deleted in the final model.
Let’s look at how to change key parts of the model by modifying the template. Remember that since the template is just an Excel file, you can modify it just like you would any other Excel file.
In many cases, Openbox relies on named ranges in the model to specify things like the column to use for constants, the first row to use for calculations and so on. These will move automatically as you insert or remove rows or columns, or you can edit them manually like any other named range.
Change the headers for each sheet
Each input, calculation and report sheet has headers in rows 1-6. This will appear exactly as it is in any models you build using Openbox. You can change the font, colour, conditional formatting and so on.
You can also insert or delete rows, if you need more or fewer than four headers. The first calculation row will automatically move down.
Everything in the “Headers” section in the Openbox model will be inserted here. Openbox will warn you if you have too many items in that section for the number of available rows.
Change which column is which
By default, labels are in column E, constants in column F, units in G, row totals in H and the first series calculation is in J. These are all defined by named ranges on the InpS sheet. In order, the ranges are:
Label,Constants,Units,Totals,FirstTime
You can edit these in the Name editor in Excel in the usual way.
Add extra sheets to every model
You can add new sheets to the template, and they will be inserted into every Excel model you create. Openbox won’t process them in any way, except if they contain an OBXValues function. If they do, Openbox will replace that function with a link to some of the calculations in the model. See this article for more information.
Change the fonts that inputs, calculations and reports will use
To do this, you need to edit the Styles in the template. There are different styles for inputs, calculations and reports, and within that, different styles for dates, percentages and so on.
For example, for inputs there are four styles: Input%, InputCurrency,InputDate and InputStyle. The first three as the names suggest will be used for %, currency and date inputs. The final one will be used for all other inputs.
The corresponding styles for Calculations are called Calc%, CalcCurrency,CalcDate and CalcStyle.
For reports they are called Result%,ResultCurrency,ResultDate and ResultStyle.
Click here for help on how to change styles in Excel.
Note that you can also set additional styles that you can apply to report items. Click here to see how.
Add standard macro(s) to every model
Simply add the macros in the VBA editor, and save the template.
Note that you can also add macros through the “Options” window.
Add custom report styles
By default, the formatting template that comes with Openbox includes two custom report styles: ReportTotal and ReportSubTotal. These can be applied to any line item in a report by clicking the “Format As” button on the Openbox Ribbon, as shown below:
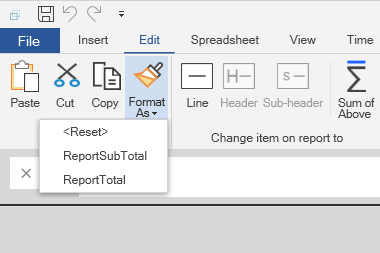
You can add new custom Styles to this. Simply add a new style to the formatting template (click here for more info). Make sure the name of the style starts with “Report”. That style will then appear in the dropdown list above, and will be applied to any report line you choose.
Note that the style will be applied in Excel, but not yet in the Openbox window. However, you can see what style is applied by hovering your mouse over the report line.
Format section headings
When Openbox converts your model to Excel, it inserts the names of sections and sub-sections as headers, in columns A, B, C and D.
You can optionally specify the format of these headers by putting “Header x” styles in the Excel template you use. “Header 1” will apply to all headers in column A, “Header 2” will apply to headers in column B and so on.
These are normal Excel styles – click here for an explanation of how to create them.
You can set the Excel template in the Options window as shown below.
Can I bring a whole model from Excel to Openbox?
Openbox lets you bring in pieces of your existing Excel models by copying and pasting (Make a new component from an existing Excel model). But what if you want to bring in an entire sheet or even an entire model?
First, open the Excel model. Select the sheet or sheets you want to bring into Openbox. Then click “Openbox” and “Import selected sheet(s)”.
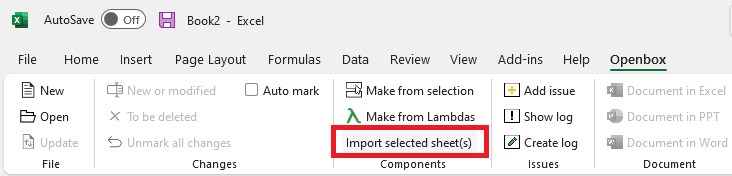
Openbox needs full access to the model for this import, and so it has to be closed in Excel. It will be re-opened later.
The process will proceed much like the process for copying and pasting,. You will be asked:
- What each column represents
- Whether you want to revalidate the model after bringing in the sheet from Excel. You may wish to do this for small sheets although we recommend reviewing the imported sheet first.
- Whether you want to merge the imported items with anything of the same name already in the model.
Once the sheet has been imported, it will have the same name as the sheet in Excel. So if you import “Construction”, you will see a new sheet called “Construction” in your Openbox model.
IMPORTANT: This only allows you to import calculation or input sheets. To import report sheets, follow the instructions here.