Changing how inputs and calculations are laid out
Click “Help and Settings” then “Openbox settings” to get the main options window, which will allow you to make changes to the way the model looks.
Other formatting changes can be made through the formatting template, which is discussed in another article. You choose the formatting template in the Options window here:
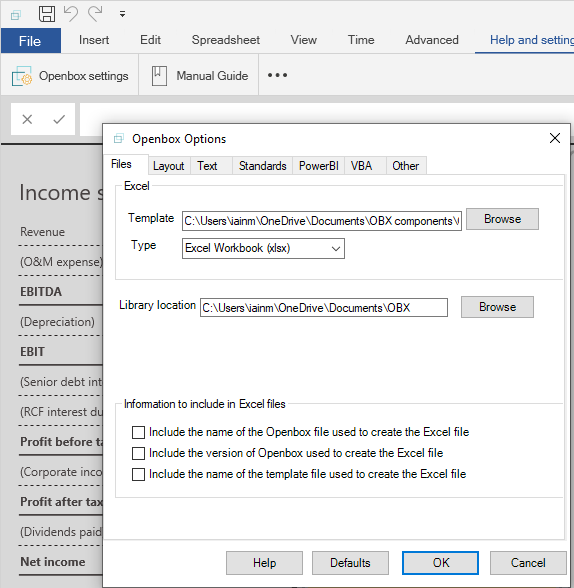
Excel file format
The ‘type’ input selects the type of Excel file to be created.
You can choose xlsx (a normal Excel file), xlsm (an Excel file which can contain macros) or xlsb (Excel’s binary format, which is smaller than the other two types).
Layout
This section sets how the model will be laid out.
Input sheet layout
There are two choices: “One sheet” and “Constants scenario”.
“One sheet” means that all inputs will be on a single sheet. While this might be a reasonable approach for smaller models, take care with larger models with many different types of input, as it can be confusing.
“Constants scenario” will create several input sheets.
One sheet will contain all constant inputs. There will be a scenario selector, and three pre-populated scenarios.
There will then be one or two series input sheets – that is, for inputs that vary over time. There will be one sheet if the model has one timeline and two if the model has two timelines (e.g. monthly construction and quarterly operations).
If you have any inputs that vary by an array – that is, table inputs – they will be inserted on a separate InpT sheet.
Inputs will always be inserted into Excel in the same order as on the Openbox screen.
Report sheet layout
For reports, you can choose either to have all reports on a single sheet “Basic”, or have a separate sheet for each report “By Report”.
Calculation sheet layout
Calculations are always set out in the following way: each list on the Openbox diagram becomes a sheet in your model, and each section within a list becomes a section on the sheet.
Layout within a sheet
You can adjust spacing between calculations and between calculation blocks. The options are:
- Spacing between inputs – how many blank rows should there be between each input. The default is 0. Note that there will always be a blank row between each section on the input sheet(s).
- Spacing between formulas – the number of blank rows between each formula, even if that formula is a local ingredient in a FAST block. In almost all cases, this should be 0.
- Spacing between blocks – in the FAST standard, each calculation has its ingredients listed in the rows above it. The calculation, and these ingredients, are referred to as a calculation ‘block’. You can specify the number of blank rows to insert between each block here. The default is one.
Finally, there are a number of settings at the bottom of the page that can be ticked or unticked.
Opening balances together
Text
Each sheet in the Excel model has a number of column headings. These are set on this sheet. You can also customise the text for balances. You can specify prefix or suffix text for the opening balance name, for each flow/ movement in the balance, and for the closing balance line. For example, if you want all opening balances to end with “BEG”, put “BEG” in the “Opening balance text”, “Suffix” box. If you want all closing balances to start with “Closing”, put ‘”Closing” in the “Closing balance text“, “Prefix” box.
VBA
This setting will add a VBA module that you specify to each file – where for example you want to implement Monte Carlo functionality. Note that Openbox does not supply VBA modules except a simple one for solving circular references.
Depending on your Excel security settings[1], adding VBA modules automatically may not be possible, and this option may fail.
Standards
This sheet allows you to specify that models created using Openbox must follow some or all of the FAST standard. For a full description of the FAST standard, and a discussion of why each option is seen as useful, see http://www.fast–standard.org.
Many of the requirements of the FAST standard are general good practice and are implemented by Openbox as a matter of course, such as copying formulas across a row. A complete list of the FAST requirements, together with Openbox’s approach to them, can be found in Appendix B.
Note that while the first version of Openbox focuses on FAST, future versions will support other good practice modelling standards.
PowerBI
If “Add a table..” is checked, Openbox will add a table to all models. This table will have model values in it, linked to the calculations, and will be in a form suitable for uploading or publishing to PowerBI. The additional options are:
- Only include items on reports. Self-explanatory; excludes model calculations to reduce size
- Create separated tables. If you would like separate tables for numbers, dates and text, tick this box.
- Put results in columns. The standard table has one row per result. If you prefer one column per result, tick this box.
- Single “varies by” column. By default, the table has one column for each array in the model. If you would like one column for all arrays, tick this box
- Single column for all values. Values are usually separated into numbers, dates and text. Ticking this box puts them in a single “values” column.
Other
The final page includes the miscellaneous options which do not fit anywhere else. These are listed in the table below.
Other options
Name | Description |
Set all inputs to NA | When the Excel file is created, do not use any input values from the Openbox model, but replace them with the NA() function. This can be useful in ensuring that every input is checked and validated by a domain expert. |
Include navigation sheet and icons | Adds a contents page to the model, with clickable hyperlinks to the start of each sheet and section |
Autofit columns | Each column will be resized to fit its contents. |
Name | Description |
Note that there are known bugs in the way Excel autofits columns and so this may not produce a perfect result. | |
Remove unnecessary sheet references in formulas | Suppose you have a formula in cell E5 on Sheet1 which is = Sheet1!C3. This is the same as = C3, because C3 is on the same sheet as E5. Removing the sheet reference makes the formula shorter, and so easier to read. It also makes it easier to copy to another sheet. Openbox can automatically remove this type of unnecessary sheet reference for you. |
Auto-save | Automatically saves the current Openbox model every few minutes |
When report line is clicked, hide everything else in the calculation view | By default, whenever you click a report line, everything except that report line and its direct precedents are hidden, to allow you to focus on it. You can turn this off by unticking the box. |
Show preview in new window | Whether the spreadsheet preview should be in a separate, new, window or whether it should be part of the main Openbox window. |
Use manual recalculation in Excel | All models generated by Openbox will have calculation set to Manual, if this box is ticked |
Allow Openbox to report unexpected errors to Gridlines | Allows Openbox to send information about where an error occurred, and standard information about your system, to Gridlines. This is anonymous. |
Add named ranges | Add a named range for each calculation in the model. |
[1] ‘Allow access to VBA object model’ needs to be checked in the ‘Trust Center’ in Excel